Saturday was a busy day! There was a lot accomplished all thanks to last week’s tip: prepare!
Dad started early on the window in the library and busted it out completely. Demolition removed the old board that was used to seal it up. Dad and I then squared up the window opening, measuring the height and the width so that it was an inch or so wider than the window itself. The reason for this is to make a seal with caulk and trim later.
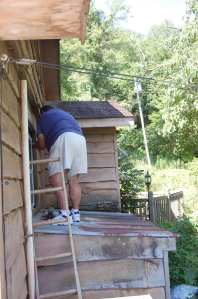
The windows we purchased need to be installed from the outside in and therefore the screws need to go on the outside. There are a few problems with accessing this part of the house:
*junk takes up room for a ladder
*there is a huge gap from the deck to the top of the storage unit below the window
*we aren’t exactly sure how old the storage unit is so it might collapse
Before heading out of doors to screw in this window dad gathers everything he needs. He uses an electric drill so he needs a power cord. We get it set up on the roof as well as the drill. We also set out our screws so that he has easy access to as many as he needs. You don’t want to be fumbling around for screws and be short if you drop a few.
With no other options we find an extendable ladder and dad climbs it.
Mom and I are freaking out but dad is confident.
Safety Tips by Dad:
*Don’t wear work boots on the roof. You want a shoe that has grip on the bottom such as a tennis shoe. This allows the shoe to grip the roofing.
*When stepping on a roof you aren’t sure of, check to see what is beneath it. Like working in old attics you want to find where the support beams are and step on them
*If you can sit down- do it. You can be sturdier on your hind-end.
If you have to work on a roof then check other ideas online. Some places suggest wearing a harness if you are going to be on a roof. We are lucky to have only a few feet between us and the ground so a harness isn’t necessary. (Thank God!)
With dad safely back inside we can marvel at our work. Nice job!
The rest of the day went smoothly and without any death defying acts on the roof. Dad finished up the plumbing. Unfortunately I can’t tell you much about plumbing because, “plumbing’s a bitch” as my dad says.
I do know that if you are doing plumbing it is important to know what type of pipe you are working with. Plumbing cements are specified for specific types of pipe. There is PVC and CPVC and not to mention the different metal piping. Always check your cement and read carefully what pipe it supports.
Always prime the pip with purple primer before you glue them together. Why is it purple? You always prime a hefty amount so that you can see the primer before you attach the pipe. This way you always know which joints you have primed. Priming removes the gloss coating on pipes allowing the cement to adhere to other pipes.
With the plumbing all wrapped up we were able to put in the kitchen windows. Ready for a step by step window replacement guide? The way we inserted our windows is a little different than other guides tell you. We Fay’s tend to throw away the instruction manual rather than read it. This way we gain memories and curse words in the end. A good guide I found is here at “Ron Hazelton’s HouseCalls”
In all actuality this is how we insert our windows, just with some necessary variations! Replacing a window is not a difficult process and it can definitely save some money when trying to redo an older house. The insulation alone is worth it in the end!
The whole family pitched in for this project and replacing four windows in a small kitchen you’ll need a hand! Unlucky enough Jay gets a bee sting, the dogs beg to be let in the crowded home, and we finish the day with hot water and three brand new windows!
Check out the change!
Before
After
We finally figured out a helpful solution to missing tools. If you leave your tools around and spend 70% of your project looking for them, grab a tool belt! It was such a success that the whole family ran
around shouting “TOOBELT!” (Yes, the ‘L’ is missing because that is how we pronounced it) when we needed something from the toolbelt. I absolutely love the tool belt and will continue to wear it throughout all my projects.
Toolbelt necessities:
Hammer, flat-head screwdriver, philips head screwdriver, small level, tape measure, channel lock pliers, and a pencil.
As always, head over to the Flickr account on the left to see more of what we did that day! Get extra tips and stories from the Fay house!


Add on a yellow construction hat and cut off jeans and you can be one of the “favorites” in the Work-It show hahaha Love ya 🙂